| Watch | Star | Fork | Open Issues | Closed Issue |
|---|---|---|---|---|
| 823 | 15711 | 4432 | 133 | 1021 |
从 Star 和 Issue 维度来看SDWebImage可谓是万众瞩目和久经考验。
How is SDWebImage better than X?
下面,我们来细致的阅读一下 SDWebImage(简称 SD)的源码。
一些良好的编码习惯
SD的扩展命名风格不错。 带有sd_ 下划线前缀以此来区分是否为 三方库扩展。避免 扩展方法重名 覆盖问题。
- 同样的命名风格适用于 类名。前缀可以避免OC语言没有命名空间的尴尬。
- 不过需要注意的是,Cocoa应用程序Apple宣称拥有”两字母前缀”的权利。 所以有可能在不远的将来,SD要面临 命名冲突的问题。
对于SD废弃的方法。 SD的做法是 将方法移至 对应的
Deprecated中。 并在方法申明的时候给出提示。这种做法,笔者也比较认同。 SDK对外的接口变更是不可避免的。在版本更新中直接删除的话,会让依赖方有改造成本。对废弃方法进行警告声明,实现上调用新方法是比较优雅和无害的。
1 | @interface UIImageView (WebCacheDeprecated) |
使用类型常量。 Effective Objective-C 2.0 中的第四条实践。
SDWebImageCompat.h
1 | extern NSString *const SDWebImageErrorDomain; |
SDWebImageCompat.m
1 | NSString *const SDWebImageErrorDomain = @"SDWebImageErrorDomain"; |
使用inline 内联函数关键词。 inline这个关键词会建议编译器内联展开处理。inline这个关键词在C++上出场频率比较高。 关于inline关键词的QA 具体的性能影响可以看[9.3]。 笔者认为 inline仅适用于调用频繁的短函数
1
2
3
4
5
6
7inline UIImage *SDScaledImageForKey(NSString *key, UIImage *image) {
...
}
FOUNDATION_STATIC_INLINE NSUInteger SDCacheCostForImage(UIImage *image) {
return image.size.height * image.size.width * image.scale * image.scale;
}
- 使用
dispatch_barrier_sync来保证一些多线程操作的原子性。 笔者也做过一些 iOS 锁的branchMarking
关于SDWebImage图片下载实现的细节
- 如何识别 图片格式? 是jpg,png还是gif呢? SD的 NSData扩展方法可以告诉你。根据图片的具体数据内容,可以看出对应的格式
1 | @implementation NSData (ImageContentType) |
- SD 缓存中的图片是 原始的,未解压的。
On the other side, SDWebImage caches the UIImage representation in memory and store the original compressed (but decoded) image file on disk. UIImage are stored as-is in memory using NSCache, so no copy is involved, and memory is freed as soon as your app or the system needs it.
Additionally, image decompression that normally happens in the main thread the first time you use UIImage in an UIImageView is forced in a background thread by SDWebImageDecoder.
关于 图片的解压,可以查看SDWebImageDecoder的实现。 SD有对应shouldDecompressImages功能开关。默认是开启的。
What does SDWebImageDecoder do? #1173
流程分析
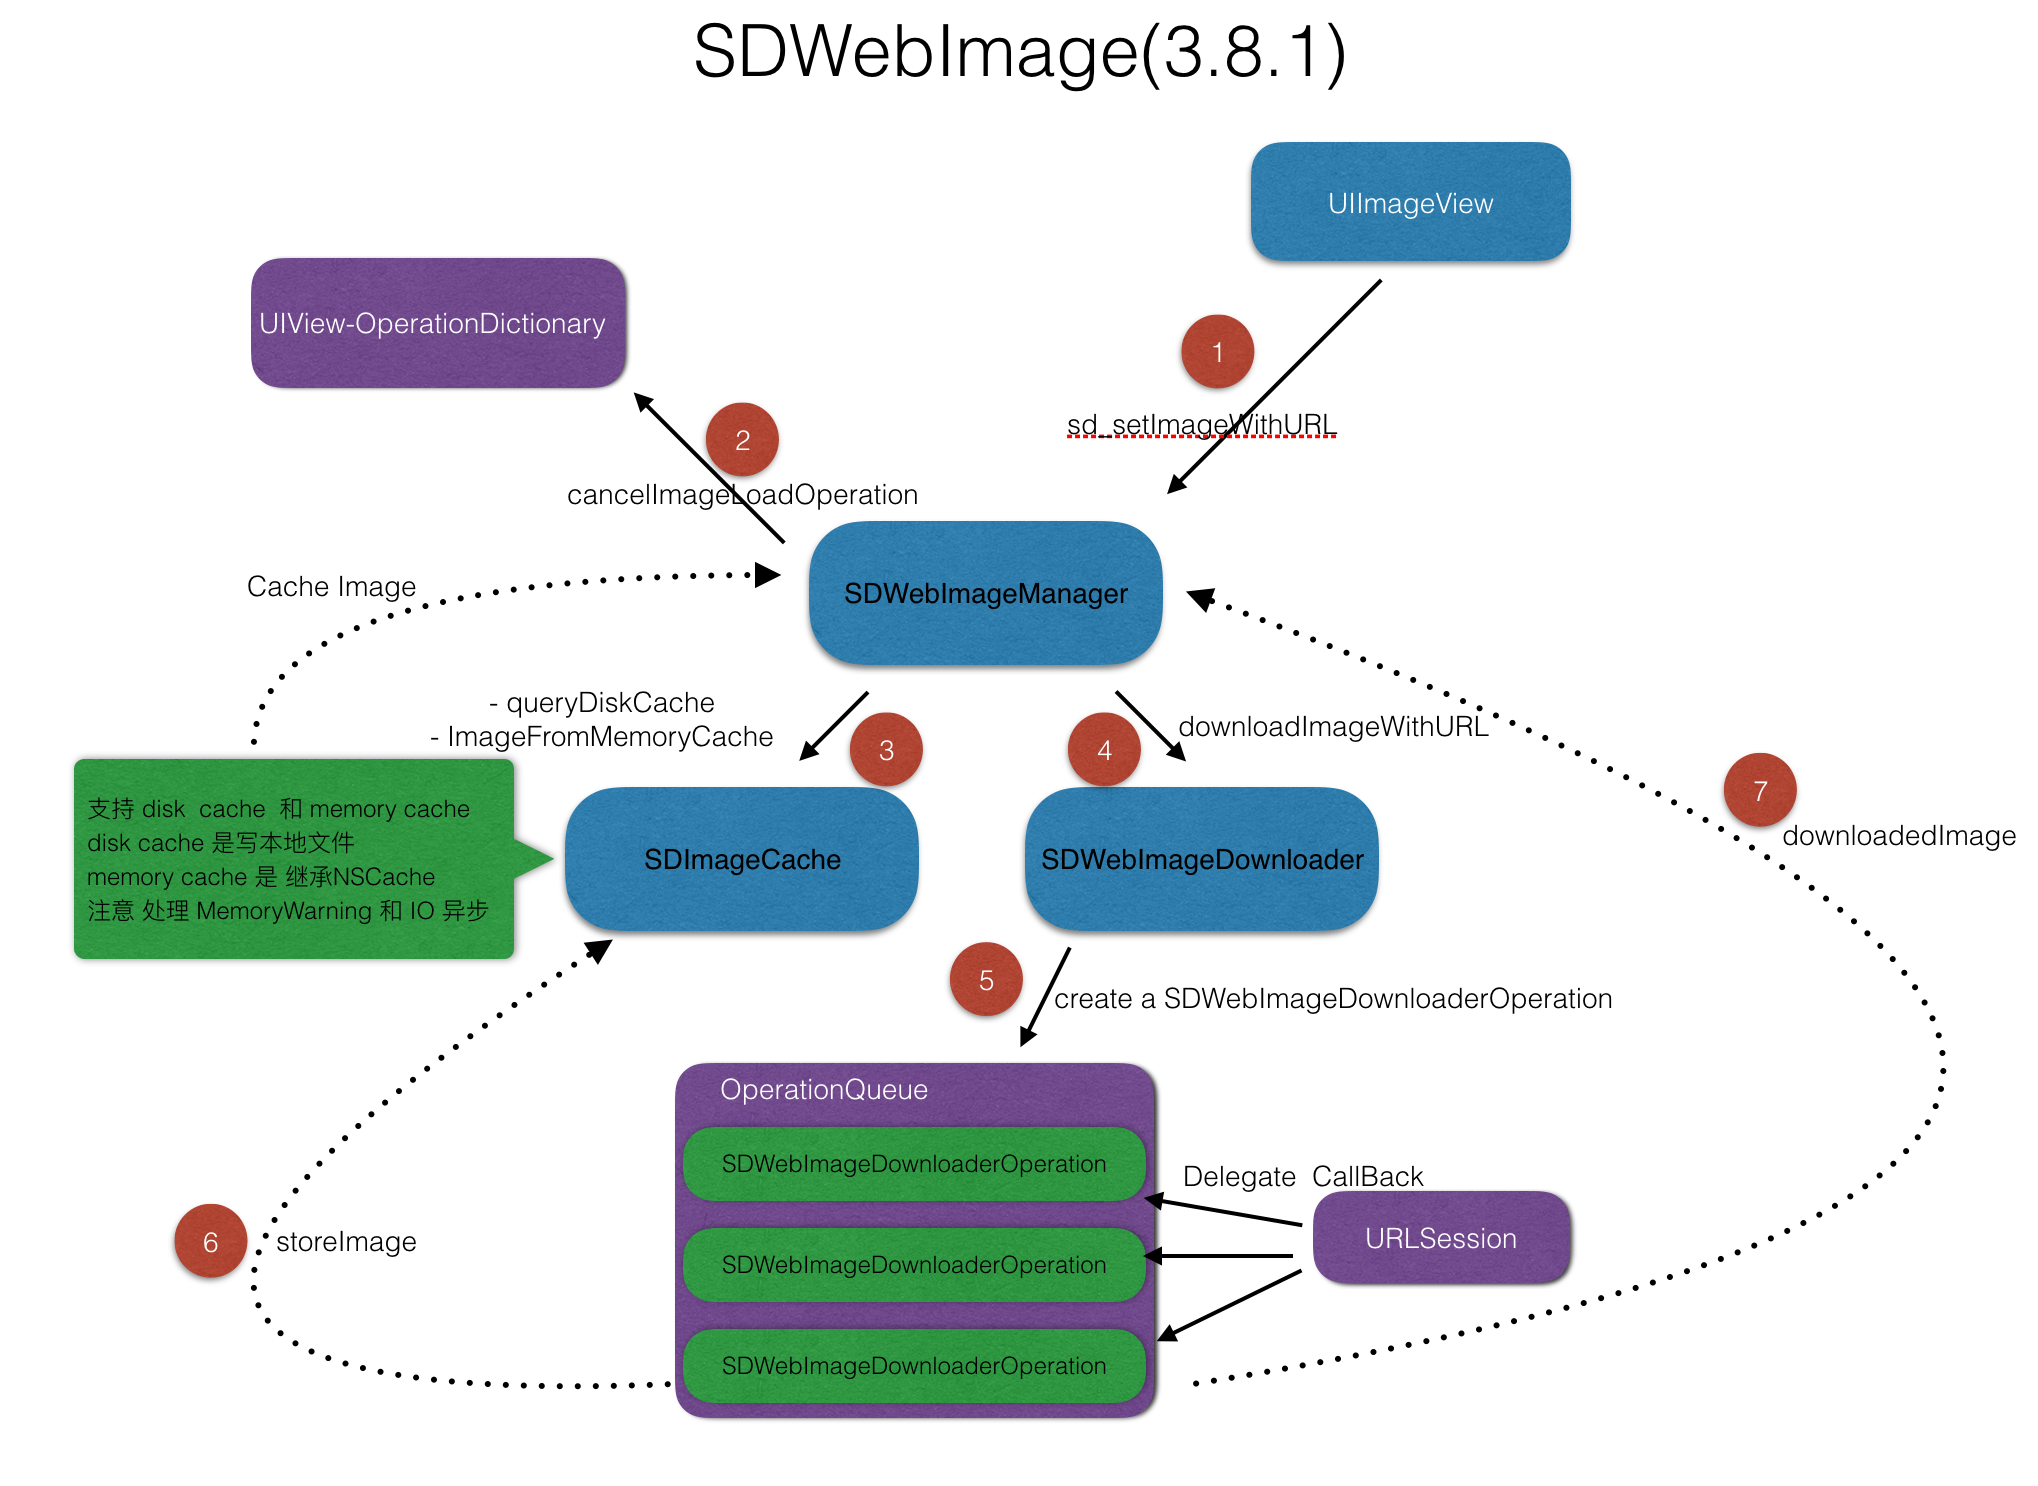
step. 3
因为,SD实现了自己的图片缓存机制。所以,在下载流程中,SD会先检查一遍是否命中缓存。
SD的图片缓存key 为url.absoluteString,SD还有一个缓存筛选机制,用来支持删除 图片url动态变更的部分。
1 | SDWebImageManager.h |
这个机制会作用于所有cache key
1 | - (NSString *)cacheKeyForURL:(NSURL *)url { |
Cache实现部分参见SDImageCache.h。
- 内存缓存部分,SD是使用
NSCahce 磁盘缓存部分,SD是读写文件操作
缓存部分,并无新意。
IO注意异步线程操作即可。SD监听了应用DidReceiveMemoryWarning,WillTerminate,DidEnterBackground等消息来处理自己的缓存,让缓存存储较为得体。应用内部缓存大小不影响宿主环境。- (void)storeImage:(UIImage *)image recalculateFromImage:(BOOL)recalculate imageData:(NSData *)imageData forKey:(NSString *)key toDisk:(BOOL)toDisk中有一段代码挺有意思的。 SD的磁盘缓存是写入imageData,一般下载结束之后,SD是能拿到image和imageData的。 但如果只有image呢? 磁盘缓存该如何写入?1
2
3
4
5
6
7
8
9
10
11
12
13
14
15
16
17
18
19
20
21
22
23
24
25
26
27
28
29
30
31
 if (image && (recalculate || !data)) {
#if TARGET_OS_IPHONE
                // We need to determine if the image is a PNG or a JPEG
                // PNGs are easier to detect because they have a unique signature (http://www.w3.org/TR/PNG-Structure.html)
                // The first eight bytes of a PNG file always contain the following (decimal) values:
                // 137 80 78 71 13 10 26 10

                // If the imageData is nil (i.e. if trying to save a UIImage directly or the image was transformed on download)
                // and the image has an alpha channel, we will consider it PNG to avoid losing the transparency
                int alphaInfo = CGImageGetAlphaInfo(image.CGImage);
                BOOL hasAlpha = !(alphaInfo == kCGImageAlphaNone ||
                                  alphaInfo == kCGImageAlphaNoneSkipFirst ||
                                  alphaInfo == kCGImageAlphaNoneSkipLast);
                BOOL imageIsPng = hasAlpha;

                // But if we have an image data, we will look at the preffix
                if ([imageData length] >= [kPNGSignatureData length]) {
                    imageIsPng = ImageDataHasPNGPreffix(imageData);
                }

                if (imageIsPng) {
                    data = UIImagePNGRepresentation(image);
                }
                else {
                    data = UIImageJPEGRepresentation(image, (CGFloat)1.0);
                }
#else
                data = [NSBitmapImageRep representationOfImageRepsInArray:image.representations usingType: NSJPEGFileType properties:nil];
#endif
            }
通过 是否有alpha通道 和 ImageDataHasPNGPreffix 来判断image类型,进而使用API进行UIimage to NSData。
step. 4
SD的下载核心逻辑是在SDWebImageDownloader。Downloader维护着一个线程池,控制SDWebImageDownloaderOperation最小单元下载任务。
- 默认并发下载量为6。可以通过
maxConcurrentDownloads修改。 - 下载超时时限默认为15.0。 可以通过
downloadTimeout修改。 - 下载任务执行顺序策略有
SDWebImageDownloaderFIFOExecutionOrder (队列等待,默认方式)和SDWebImageDownloaderLIFOExecutionOrder (栈等待)
Downloader实现NSURLSessionDataDelegate协议,并将回调派发给具体的DownloaderOperation来响应下载各个阶段的数据回调。
DownloaderOperation继承自NSOperation并实现SDWebImageOperation。都是为了保证下载任务能被cancel。cancel对应一个任务而言是很重要的。因为继承自NSOperation,所以SD在cancel部分的实现也很简单。
1 | - (void)cancel { |
保证cancel操作的原子性,调用[super cancel] 和 将内置的[self.dataTask cancel]。重置一些状态位即可。
SD的下载逻辑实现还是写的比较精彩的。清晰和严谨,不愧是“久经考验”
其他
SD还有SDWebImagePrefetcher模块。顾名思义,Prefetcher就是预下载逻辑。提前拉取图片资源,等到用的时候直接取用本地资源。本地IO速度快于网络IO,是一种优化思路。
查看SD源码时,一些查阅的链接。 有些启发,在这里记录一下。
Understanding SDWebImage - Decompression
Resizing High Resolution Images on iOS Without Memory Issues